Tuesday, January 6, 2015
A Wavy Welted Hat!
This hat was conceived because I wanted to do feather and fan in a hat but with a straight hem. I decided to work it sidewards and was so pleased with the results that I published the pattern!
It's here;
http://www.craftsy.com/pattern/knitting/accessory/wavy-welted-hat/57552
It's also here on Amazon;
Would that a picture would show with the links.


Saturday, July 13, 2013
Hand Made vs. Mass Produced - You Choose.
The more Walmart drops it prices, the more BJs, Costco and Sam's Club sell their prepackaged looks, the more individualism is lost. We are a sad and sorry society wearing cookie cutter cloths, accessorized with pre-stamped 'fashion' robo-like uniforms purchased from mass marketers.
You may be satisfied with mass marked prefab looks but you should know, you have an option. There is another way. You can learn to make your own cloths in your choice of colors, designs and variations for your closet. Even if you just choose to make your own accessories, the look you create is yours and yours alone.
Learning to knit can be a path to a relaxing pass time as well as an avenue towards self expression and individualism in your wardrobe.
Here are a few easy patterns that I designed, interspersed with a few books that I published, you might like to try them out and learn to create you own personal look;
http://www.amazon.com/Ann-C.-Cooney/e/B0052T7QG0/ref=ntt_athr_dp_pel_pop_1
"ZZ's Welted Hat," is a popular pattern. It's easy, quick and fun to knit.
 Patterns for these other pieces can also be found among my Ravelry and Craftsy knits;
Knancyknitter is my name on Craftsy and on Ravelry I am, The knancy knitter.
Patterns for these other pieces can also be found among my Ravelry and Craftsy knits;
Knancyknitter is my name on Craftsy and on Ravelry I am, The knancy knitter.


Tuesday, March 20, 2012
The winged thing, my 'Wingspan'
Well, it happened, I finally worked a pattern from start to finish. (look for the 'Wingspan' pattern on Ravelry.) This one was sooo cool, I just had to try it. It was remarkably easy! This is an, as yet an unblocked, look at the finished piece.


Done in Mini Mochi, lovely colors that yarn house has :-D
To see the novels I've written or to catch up on my, "White Witch," Y.A. series, check the link below the last picture. http://www.amazon.com/Ann-C.-Cooney/e/B0052T7QG0/ref=ntt_athr_dp_pel_1 All the series is now complete, all fourteen books are now finished. You nay need to cut and paste the link.


Done in Mini Mochi, lovely colors that yarn house has :-D
To see the novels I've written or to catch up on my, "White Witch," Y.A. series, check the link below the last picture. http://www.amazon.com/Ann-C.-Cooney/e/B0052T7QG0/ref=ntt_athr_dp_pel_1 All the series is now complete, all fourteen books are now finished. You nay need to cut and paste the link.
Sunday, June 5, 2011
A teddybear face on an 8 x 8 inch sq.


An eight inch square with a teddy bear face knit into then quilted into it. I used a small firm bit of rolled yarn for the nose. I then took a headband that has been sitting in my stash, I knit it quite a while ago and did not really like the finished product so I folded it up and used it to stuff teddy's snout. The mouth and eyes are whip-stitched and along with the nose are magic markered to blacken them. The outline of the bears head is done with French Knots in a rust colored yarn to emphasise the stitching differences. The entire face square is backed with another 8 inch square in stockinette to hide the open padding and stitching and to return the 8x8 dimension lost by the quilting. I think he is rather handsome, no?
Monday, May 16, 2011
ankle bracelet socks


These are pretty simple except that I added beading to one ankle, like an ankle bracelet. I used invisable thread n put the beads on the thread before I started. Then I added the strand of invisable thread to the working yarn and went around the ankle once; sliding one bead up and in place per stitch. They are fresh water rice pearls and agate with one clear cristal on the outside of the ankle. The rest of the sock is a generic short sock.
I appologise for the focus in the close up of the beading. I could not get my camera to 'see' any closer.
A Rainbow Snood, some creative stitching and casting off
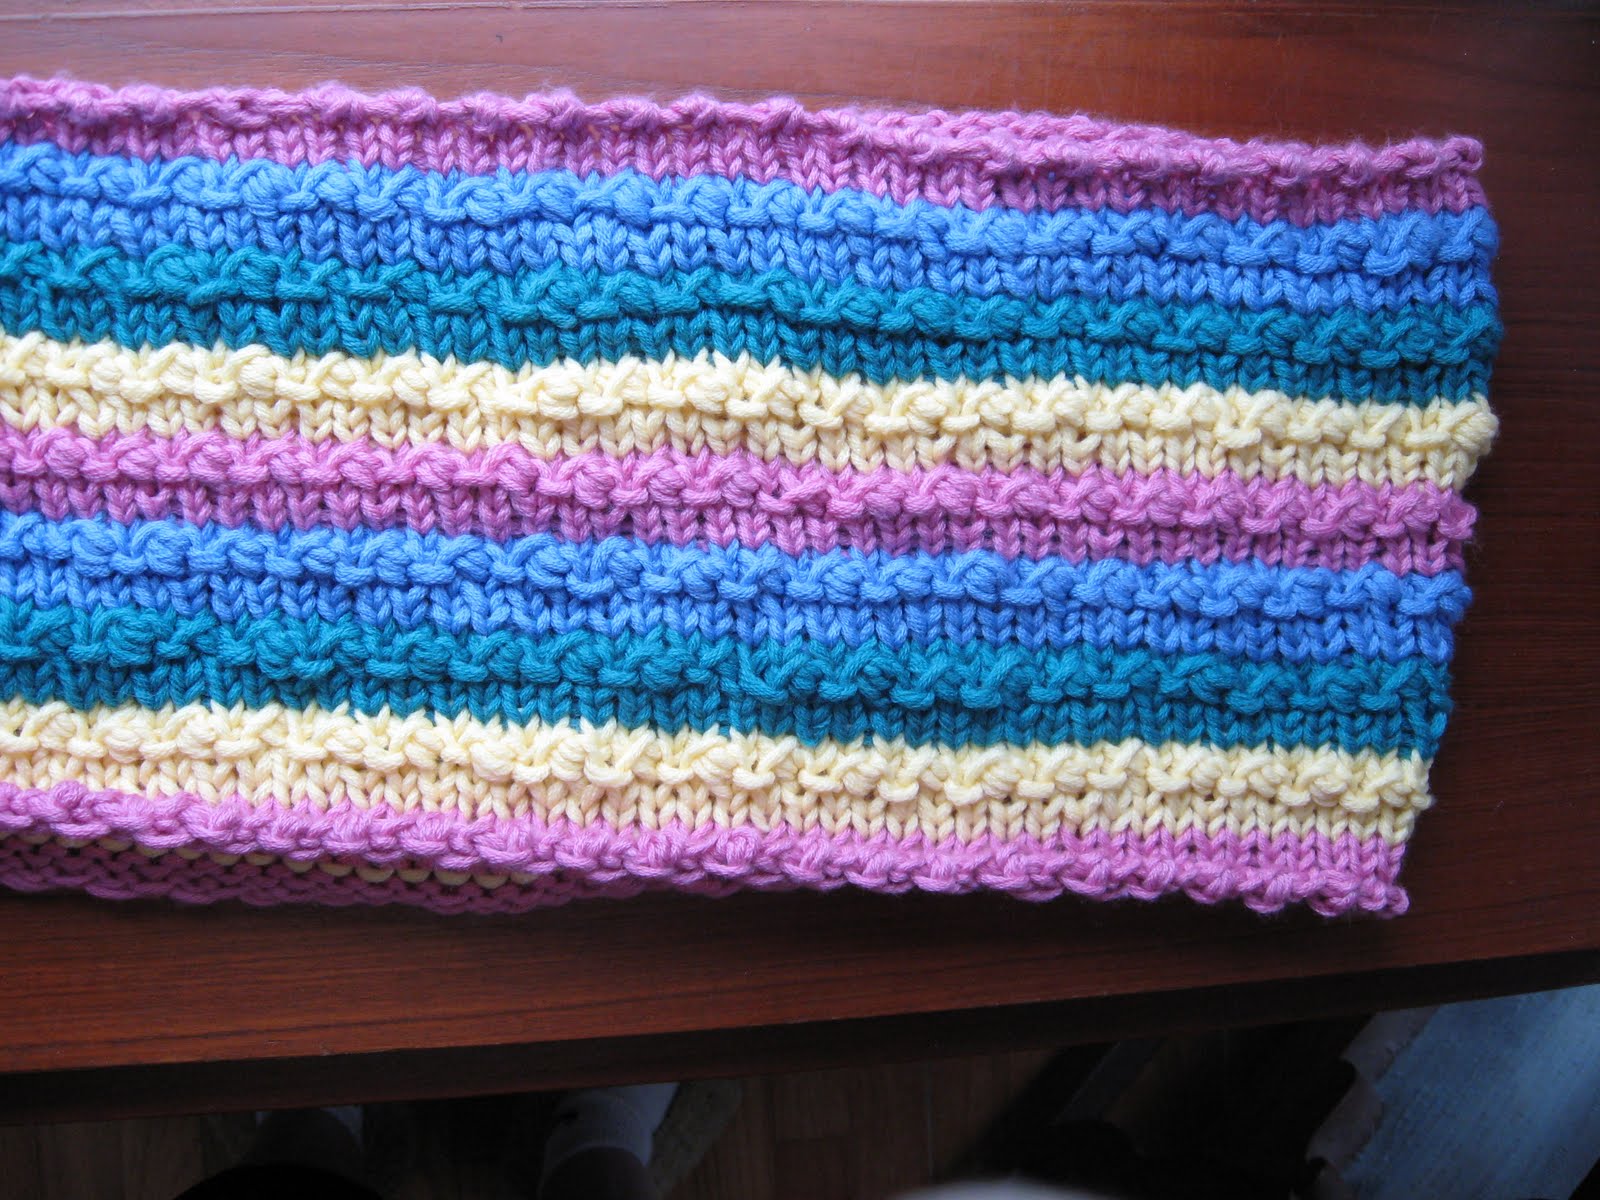
It's finished. The colors in this pict are not at all true. It's a soft rasberry pink, a pale terquoise, a forest green and a buttercup yellow. This shows the finished snood, the cast-on, the stitching and the cast-off. It is long enough to go around the neck twice loosely or you can pull up one loop from the neck and wear it as a hood. Either way it is snuggly warm.

This is the cast-on. I used the Channel Island Cast-on to create texture along the edge.

And this is the cast-off, I did something a bit different here. I used the stitched stretchy castoff but on the row before I cast off, I set up with a single strand stitch alternating with a tripple strand stitch. It created a slight 'beading' on the cast-off edge to balance the texture of the cast-on.
The body of the piece is done with a textured row to create even more profile/texture in each stripe.
All in all, it's a very warm snuggly rainbow piece.
Sunday, May 8, 2011
A post for sharing my pictures, subject to change.
Baby blankets for some precious twins, there are three blankets because one is always in the wash (and I had more yarn then I needed for two blankets);


Tuesday, March 8, 2011
Ta daaa, finally a pair of socks.

I finished them. My first pair of socks. They are not particularly pretty nor fancy but just getting this generic pair finished was a huge accomplishment for me. You might have realized by now that I am someone who hates following instructions for knitting so the minutia of a sock's heel tab, heel and toe were torture for me.
They are ribbed, k1,p1, at the top and for those who 'do socks' I used the k1, s1 bit to start the heel and a Kitchener stitch to close the toe. They are really a pretty generic accomplishment but for me they were a rather big deal. I lost count of the many incarnations of my first sock, but when the first of this pair was finished, the second one was easy!
Now I can happily get creative on the next pair. :-D
Sunday, March 6, 2011
Socks, my final attempt at a first pair.
I suppose you may be wondering what my needles are into these days.
I have been, it seems forever, trying to complete a pair of socks. It's that thing that I have about following patterns, it's just not my style. I just get a pretty yarn n it inspires me to create something great.
So of course, for me, socks do not come easily as the sock making process is very much dependant on following directions exactly. My first sock has had too many incarnations to mention, I lost count.
So far I have finished one sock, when I have a pair I will post a picture and heave a huge sigh of relief.
I have a few creative ideas that I want to incorporate into the next pair but first I thought I should know how knit a basic sock. It may be a while but I will get there.
I have been, it seems forever, trying to complete a pair of socks. It's that thing that I have about following patterns, it's just not my style. I just get a pretty yarn n it inspires me to create something great.
So of course, for me, socks do not come easily as the sock making process is very much dependant on following directions exactly. My first sock has had too many incarnations to mention, I lost count.
So far I have finished one sock, when I have a pair I will post a picture and heave a huge sigh of relief.
I have a few creative ideas that I want to incorporate into the next pair but first I thought I should know how knit a basic sock. It may be a while but I will get there.
Sunday, February 20, 2011
My capella, a longer version
This garment was inspired by a short sweater on Ravelry, the pattern was titled a, "capella wrap". I thought, why not make it longer, like a car coat? It would be that much warmer.
 Here is the result of my work on that idea,
 A back view of the collar,
 And how the entire back looks.
I worked a panel first that was long enough to go from one knee, round my neck, and down to the other knee. It was about 20 inches wide, ribbing K2, P2 on the starting edge, then knit to define the lacy row of wrapped stitching with a blue yarn added, the rest is done in seed stitch.
After casting off, I crochet-grafted a panel in the middle of the piece making the grafted piece as wide as my back. I knitted it, K2, P2 ribbing, for about five inches and then added four inches onto either side of the ribbed panel for ease under the arms. I continued to knit entirely in ribbing until the back panel came down to one inch beyond the knee of the 'knee, round the neck to knee panel'.
I added a blue stripe to turn up as a hem then I cast off n hemmed in the same operation using the sewn cast off. I stitched up the sides and you see the results here. The hem on the back panel keeps the ribbing from pulling in to much at the bottom. A bit of blocking will fix the 'sway' in the front sides.
There is very little shaping involved, just two rectangles; other then adding to the sides for ease under the arms.
 Here is the result of my work on that idea,
 A back view of the collar,
 And how the entire back looks.
I worked a panel first that was long enough to go from one knee, round my neck, and down to the other knee. It was about 20 inches wide, ribbing K2, P2 on the starting edge, then knit to define the lacy row of wrapped stitching with a blue yarn added, the rest is done in seed stitch.
After casting off, I crochet-grafted a panel in the middle of the piece making the grafted piece as wide as my back. I knitted it, K2, P2 ribbing, for about five inches and then added four inches onto either side of the ribbed panel for ease under the arms. I continued to knit entirely in ribbing until the back panel came down to one inch beyond the knee of the 'knee, round the neck to knee panel'.
I added a blue stripe to turn up as a hem then I cast off n hemmed in the same operation using the sewn cast off. I stitched up the sides and you see the results here. The hem on the back panel keeps the ribbing from pulling in to much at the bottom. A bit of blocking will fix the 'sway' in the front sides.
There is very little shaping involved, just two rectangles; other then adding to the sides for ease under the arms.
Wednesday, February 2, 2011
A Shrug, no matter how you wear it
I was inspired to create my shrug by this website; http://www.stitchdiva.com/ProductInfo.aspx?productid=SDS-055.
I did not use the pattern that is offered on this site but I used the pictures and the video as a jumping off point for this shrug;
 front and back

~ ~ ~ ~ ~


This is how it looks when you turn it the other way up (I do not want to call a it upside down becuse there seems to be no right side up, it is right both ways).
~ ~ ~ ~ ~

This is a peak under the collar to see how it is seamed up.
~ ~ ~ ~ ~
It is done mostly in seed stitch with a ribbed edge and two rows of wrapped needle stitches. It is knit from side to side the long way, not from end to end. It is warm, interestingly fashionable and so versitle, everyone who sees it loves it. I used Wenseydale yarn from Crimson Shamrock in West Virginia. A lovely long staple yarn that knits up beautifully.
I did not use the pattern that is offered on this site but I used the pictures and the video as a jumping off point for this shrug;
 front and back
~ ~ ~ ~ ~


This is how it looks when you turn it the other way up (I do not want to call a it upside down becuse there seems to be no right side up, it is right both ways).
~ ~ ~ ~ ~

This is a peak under the collar to see how it is seamed up.
~ ~ ~ ~ ~
It is done mostly in seed stitch with a ribbed edge and two rows of wrapped needle stitches. It is knit from side to side the long way, not from end to end. It is warm, interestingly fashionable and so versitle, everyone who sees it loves it. I used Wenseydale yarn from Crimson Shamrock in West Virginia. A lovely long staple yarn that knits up beautifully.
Monday, December 13, 2010
The dreaded purl curl, fixed :-D
As you may have guessed from my header, my grey wrap, after much blocking and steaming, still had the dreaded purl curl at the hem. Then Holly suggested making an hem to stabilize it. Thanks again Holly, you are pure genius.

I picked up the stitches from the inside edge of the hem and knit them with a very fine glittery mohair. Three rows later on huge needles, the fine yarn produced a net like lacy bit, about an inch deep, at the hem. I cast it off using the stitched castoff incorporating a row of the grey stitches from the inside of garment that had the curl issue.

The end result was a flirty, very slight, red edge along the bottom that only shows with movement.

The best part of this neat 'Holly's Hem Trick' is that there is no curl left at all, it hangs nicely.
~~~~~~~~~~~~~~
Many thanks Holly, you rock.

I picked up the stitches from the inside edge of the hem and knit them with a very fine glittery mohair. Three rows later on huge needles, the fine yarn produced a net like lacy bit, about an inch deep, at the hem. I cast it off using the stitched castoff incorporating a row of the grey stitches from the inside of garment that had the curl issue.

The end result was a flirty, very slight, red edge along the bottom that only shows with movement.

The best part of this neat 'Holly's Hem Trick' is that there is no curl left at all, it hangs nicely.
~~~~~~~~~~~~~~
Many thanks Holly, you rock.
Thursday, December 2, 2010
Snug n warm a cowl that doubles as a snood

This is a cowl/snood that I just finished blocking. It was done with some lovely Wenseydale yarn that I acquired access to up at the Rhinebeck Sheep n Wool Fiber Fest. The sheep that produce this particular yarn are raised in West Virginia, they have the most amazing long staples. I just love working with their wool and, due to those lovely long staples, it is very strong.

I used a smart sewn cast off that came out very nice n stretchy as promised. It was the first time I tried this castoff and you can see in this pict, it stretches nicely. This is a link to the cast off instructions that I used;
http://www.woolywonder.com/classpages/sewncastoff/sewncastoff.htm
It's an easy one, just do not tug too hard on your sewing yarn or you will loose the stretch. You need to leave enough of a loop on the edge of the casted off piece that, the yarn you pull through with the sewing needle, is left looking like a, "purl stitch bump."
This piece was done with a 100% Wenseydale wool three ply yarn, it yielded about 4 stitches per inch in stockinette.
With long tail method; casting on 72 stitches, work in the round k2, p2 ribbing for 1 1/2 inches.
Then work 1 1/2 inches of stockinette stitch.
Do a basket weave with k2 p2 creating 1 inch for each of 3 woven basket straps (that's two switches going from purl to kint n from knit to purl in a row).
Work 1 1/2 inches of seed stitch then finish with 1 1/2 inches of the same k2 p2 ribbing.
Cast off with the sewn cast off shown in the link above.
Thursday, November 11, 2010
Well, I love the shoulder wrap but the bottom edge is still curling rather intensly inspite of my occasional knit amoung the purls and aggressive blocking. I am going to pick up stitches from the bottom edge and work on a hem to hold the edge down. (Thank you Holly for the diea, I never thought of a hem on a knitted piece.) I'll prob. do the hem in red alpaca or blue. I need to see how much yarn I have of each n how much it will take.
Sunday, October 31, 2010
Blocking the grey tweed shoulder wrap
Well, it's not a pretty system but it does block the piece;

You can see I've held down the bottom edges with cloths pins to fix the yarn so it does not curl. I ribbed around the top edge to create a cowl neck and the cable twists are visible on the front. All in all it is a nice warm wrap to wear with a dressy outfit. I will also probably need to steam it along the bottom edge.

You can see I've held down the bottom edges with cloths pins to fix the yarn so it does not curl. I ribbed around the top edge to create a cowl neck and the cable twists are visible on the front. All in all it is a nice warm wrap to wear with a dressy outfit. I will also probably need to steam it along the bottom edge.
Sunday, October 24, 2010
It's a wrap, in gray mohair tweed.
We all know how dressy dresses, both formal and informal can be a bit, well, lets say less then warm. We want to wear that dress, it's so pretty. The winter weather, on the other hand is just not cooperating. Keeping your coat on is not going to look good and no one will be able to see the pretty dress that you wore. Well this piece is my solution to that dilemma.
Enter the knit shoulder wrap, problem solved.
 The first cable twist is in place.
 A close up of one of the cables.
This will be a wrap done in a silvery grey mohair knit. It is a simple but elegant tube that goes on over the head and is worn around the shoulders. I have just knitted the first row past the first cable link. I've never done anything with big cables before so this is new to me. I am doing a wide five stitch cable. I will be posting the finished project if it turns out as planned. It should.
Enter the knit shoulder wrap, problem solved.
 The first cable twist is in place.
 A close up of one of the cables.
This will be a wrap done in a silvery grey mohair knit. It is a simple but elegant tube that goes on over the head and is worn around the shoulders. I have just knitted the first row past the first cable link. I've never done anything with big cables before so this is new to me. I am doing a wide five stitch cable. I will be posting the finished project if it turns out as planned. It should.
Sunday, October 3, 2010
Knobble Kuffs, Kno More Knausia, LOL

This picture shows the cuff inside out, the knobble/bump should be facing the wearer's wrist.
Kno more knausia knobble kuffs.
The idea for this cuff is based on Chinese Medicine. It uses an acupressure point located inside the wrist. My thanks to my good friend and massage therapist, Jan K., for teaching me this point and for making me awair of just how versatile this point is.
There is a similar cuff available commercially that is made of a synthetic material and a hard plastic pointy button. This commercial cuff can, after extended use, distress the skin. I made this cuff from 100% cotton yarn to avoid skin problems.
Work with #6 to 8 (USA sizing) DPNs depending on the yarn you've chosen. These are made for an adult woman with a small-medium wrist. Adjust your stitches as needed to accommodate the user's wrist. A small bead can be placed into the knobble if more pressure is needed to achieve the desired effect.
In the middle of a 28 stitch purl faced cuff, place a knobble;
Keep the tension of the knobble stitches snug to give it firmness.
Knit three stitches into one, turn your work and purl those same stitches back, turn and knit them back again.
Next row; purl one, knit three into one and turn the work to purl those three back into one. (The change in the texture of the face to 'knit' makes the face of the knobble stand prouder.) finish the row by purling the next stitch.
Knit n purl those same orig. three stitches of the knobble turning for each row. Make sure you Knobble is protruding from the purl face, not the knit face of the cuff, push it through if it is on the wrong side. Continue knitting in the round to complete the cuff.
These cuffs can be used for chemo nausea, pregnancy nausea, sea/motion sickness, hiccoughs or indigestion. The point, known as P6 in Chinese medicine, can be easily land marked by bending the wrist in so that the palm faces the wrist. Place three fingers from the other hand into the crevasse formed at the wrist so that they are tucked side by side facing the wrist. The point is right where your thumb tip sits with your fingers so arranged. it is right over the tendon cords that you can see (or feel) inside your wrist. Just make sure that the knobble is pressing on this point.
This is a link to a alternative medicine site that describes the point well;
http://www.altmd.com/Articles/Acupressure-for-Nausea
Scroll down about mid page you will find the point locator description for P6.
This blog entry is not intended to be a substitute for the care of a competent physician. As in all things; contact your doctor if you can not get relief for your symptoms or if your symptoms can not be explained.
Friday, August 20, 2010
That Off White Scarf Vest with the Bronze Stripe
Just a quick update;
It's been warm n humid here in NJ so there has not been a whole lot of knitting going on in the heat.
I did get one side of that white scarf vest finished. I tapered it almost to a point and then left three short (about an inch n a half in length) strips one of each. They are off white, bronze, off white, and each strip is five stitches wide. I'm not sure how I am going to fringe the three strips.
The other side is longer then the first side, that is intentional as I want one side longer to toss over the shoulder, scarf style (You want rules, consistancy, symmetry, forget it this is my creation, I doubt I'll ever follow anyone elses rules). I am not sure how I am going to finish the longer side yet. Perhaps one side with something intricate and the other with a plain straight knotted fringe? I'll see.
I like the way the irregular rib over the back turned out. It has a definite spinal look to it. The spinal effect would look very interesting in a snug blue sweater, perhaps with a single braid at the hem, tail style.
It would be very, "Avatar," looking!
I'll add a picture as soon as it's closer to being finished.
The cuff to cuff cardi is on the back burner again. It is too bulky to work on in this heat. I may get it finished to wear it by next summer.
It's been warm n humid here in NJ so there has not been a whole lot of knitting going on in the heat.
I did get one side of that white scarf vest finished. I tapered it almost to a point and then left three short (about an inch n a half in length) strips one of each. They are off white, bronze, off white, and each strip is five stitches wide. I'm not sure how I am going to fringe the three strips.
The other side is longer then the first side, that is intentional as I want one side longer to toss over the shoulder, scarf style (You want rules, consistancy, symmetry, forget it this is my creation, I doubt I'll ever follow anyone elses rules). I am not sure how I am going to finish the longer side yet. Perhaps one side with something intricate and the other with a plain straight knotted fringe? I'll see.
I like the way the irregular rib over the back turned out. It has a definite spinal look to it. The spinal effect would look very interesting in a snug blue sweater, perhaps with a single braid at the hem, tail style.
It would be very, "Avatar," looking!
I'll add a picture as soon as it's closer to being finished.
The cuff to cuff cardi is on the back burner again. It is too bulky to work on in this heat. I may get it finished to wear it by next summer.
Friday, June 25, 2010
This is the beginning of a new project, one that will travel easily. It is an off white scarf/vest, the same idea as the first piece I blogged about. It has a metallic coppery trim knit into it. (The piece is in desperate need of blocking, the knitting not really that uneven.) I worked in an irregular rib up the middle of the back shown here. I was looking to make it reminiscent of the spine.


This is a close up of the coppery trim yarn. It is like knitting with a strand of DNA as the space between the color spots is open between the black edges. It makes it very interesting as getting both black strands together for the stitch can be a bit blinding. I feel that the result tho, is worth the effort.

This is a close up of the coppery trim yarn. It is like knitting with a strand of DNA as the space between the color spots is open between the black edges. It makes it very interesting as getting both black strands together for the stitch can be a bit blinding. I feel that the result tho, is worth the effort.
Thursday, June 17, 2010
Still working the cuff to cuff
Well, have returned to that cardigan. I am determined to finish it, I'll prob. incorporate the 'front line problem' into a design feature. We'll see. I may do a tube tank to go with it when it's done.
Subscribe to:
Posts (Atom)

 Posts
Posts

